Standard Operating Procedure
Daily Video Upload
Pull every ready video from the Nexus employee dashboard, upload it to the correct YouTube channel, and mark it as uploaded. Check the dashboard at least once a day — any video sitting in the In Stock band is yours to handle.
Targets & Cadence
Dashboard
Cadence
At least once per day. Upload every video sitting in the In Stock band.
Target channel
Shown on every row as a coloured badge next to the title. Click into the Channels tab and pick the channel to see its full header (channel name + browser_account + proxy ID).
Browser profile
The channel header lists the AdsPower profile under browser_account (e.g. emp-T-mult). Always open that exact profile before uploading.
UI TOUR
What You’re Looking At
Goal: Know which tab to use and what each thing on the screen does. Read this once.
Today
Default landing. Time-sorted feed of every video ready for you across all your channels. Use this when you want to power through whatever’s waiting.
Channels
Channel-first view. Card per channel with cadence + in-stock count. Use this when you want to work one channel at a time, or to look up the channel’s browser_account.
Walking
Shared walking-pool. Vlog clips any VA can pick up. Independent of normal channel work.
STAGE 1
Pull the Video From Nexus
Goal: Copy the title, description and tags out of Nexus, and download the video + thumbnail.
Open employees.nexus-data.de/today and log in. You land on the Today view — every video waiting for an upload sits in the In Stock band.
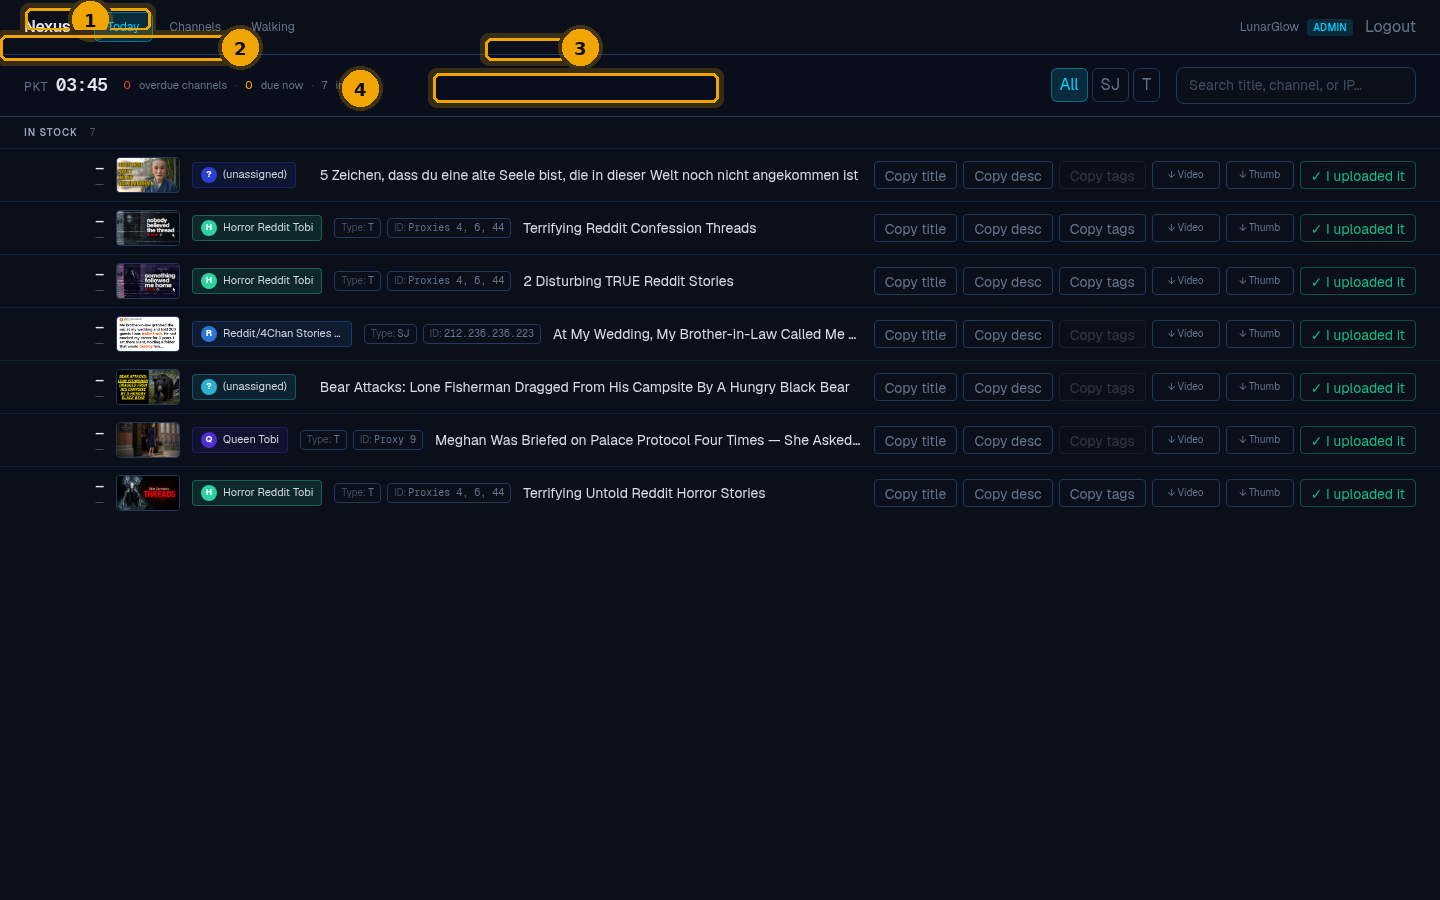
Today view — your work feed
Legend
1Tab navigation. Today (this view), Channels (per-channel cards), Walking (shared pool).
2Your timezone clock + work counters. Shows current Karachi time, overdue channels, due-now, and how many are sitting in stock for you.
3Operator filter pills. Narrow the feed to videos for one operator (your initials). The All pill shows everything you’re assigned.
4Action row. Each video has six buttons on the right side — copy title, copy description, copy tags, download video, download thumbnail, mark uploaded. Stage 1 covers the first five.
Want to pick channel-by-channel instead? Click the Channels tab — each card shows the cadence and how many videos are in stock for that channel.
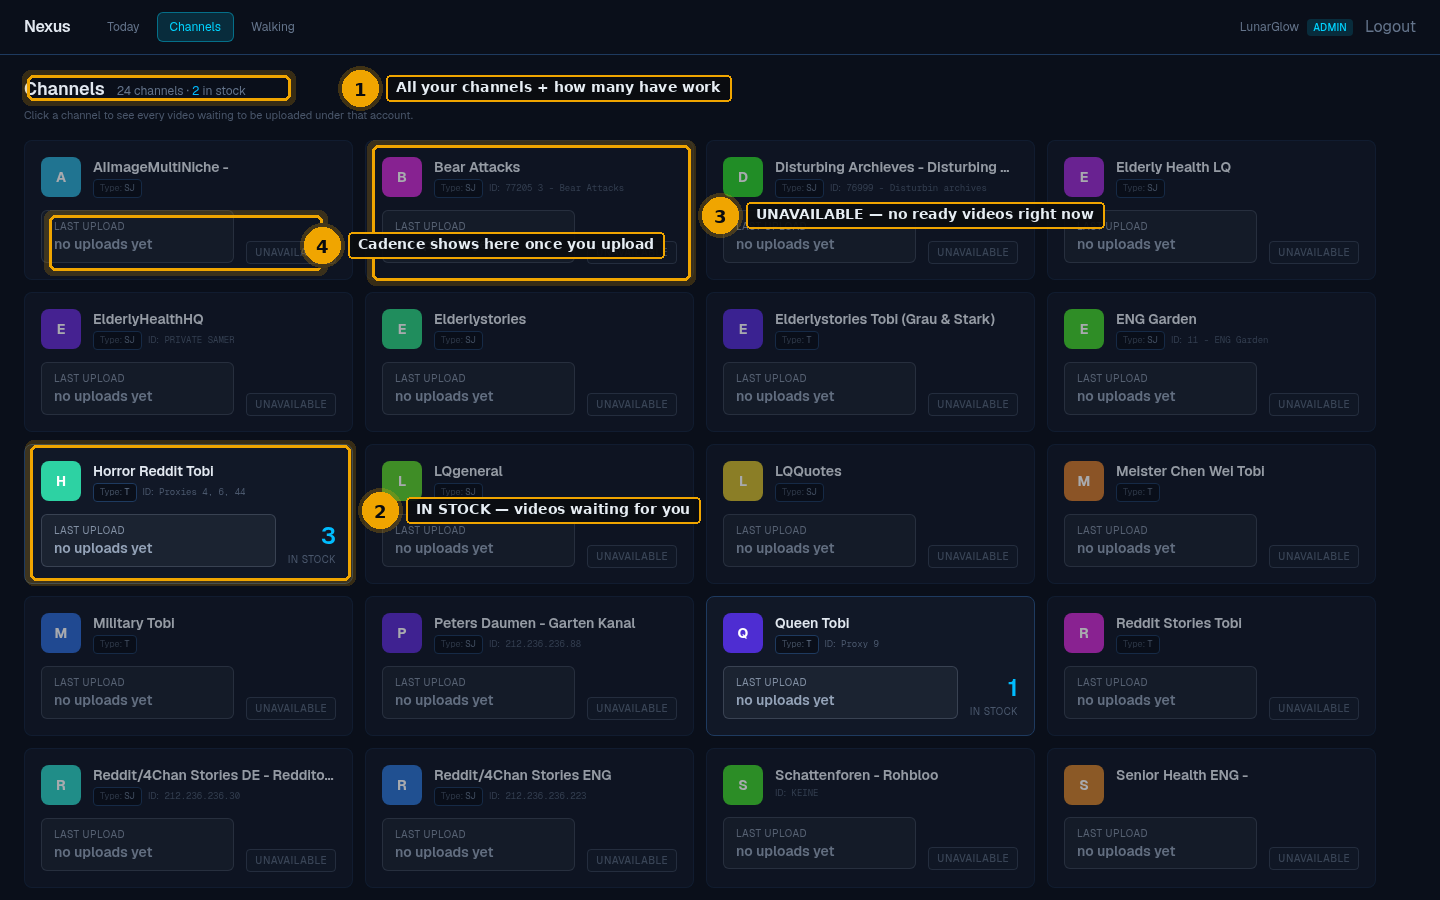
Channels view — cadence + in-stock per channel
Legend
1Channel count + in-stock summary. Top-of-page header tells you how many channels you can see and how many have work waiting.
2Channel WITH stock. Highlighted card shows an IN STOCK count on the right side. Click into it to see the videos.
3UNAVAILABLE channel. No ready videos right now. Card is dimmed. You can still click in — just nothing to upload yet.
4Last upload. Reads no uploads yet until your first “I uploaded it” click. After that it shows how long ago you last uploaded and shifts colour from green → yellow → orange → red as the channel approaches and crosses the 24-hour cadence.
Pick a row to handle. Use the five action buttons to grab everything you need into your clipboard / downloads folder.

Row affordances — copy + download in five clicks
Legend
1Copy title. Title goes onto your clipboard. Paste into YouTube’s Title field in Stage 2.
2Copy desc. Description + hashtag line in one go. Paste into YouTube’s Description field. Do not lose the hashtag line at the bottom.
3Copy tags. Comma-separated tag list. Paste into YouTube’s Tags field.
4↓ Video. Downloads the .mp4 file to your downloads folder.
5↓ Thumb. Downloads the thumbnail .jpg — use this in YouTube’s Thumbnail → Upload file field, NOT auto-generated.
✓The green I uploaded it button is for Stage 3 — don’t click it yet.
Before leaving Nexus, click the Channels tab → click the channel for this video and check the header. You need the browser_account to know which AdsPower profile to open next.

Channel header — the only place you need to look
Legend
1Channel name. Match the YouTube channel exactly.
2Type · browser_account · proxy ID. The emp-T-mult-style string is your AdsPower profile name.
3In stock. Number of ready videos sitting on this channel right now.
4Uploaded today. Increments each time you click “I uploaded it” on a row.
STAGE 2
Upload to YouTube
Goal: Upload the file to the YouTube channel listed on the channel header — nowhere else.
⚠ CHECK BEFORE YOU UPLOAD
Wrong channel = burned account. Open the AdsPower profile whose name matches browser_account from the Nexus channel header. Then confirm the YouTube avatar in the top-right of YT Studio matches the channel name. If they don’t match, switch accounts before doing anything else.
Open the correct AdsPower browser profile and confirm you’re logged into the right YouTube channel.
Confirm the YouTube account matches the target channel
Open YouTube Studio and upload the video file you downloaded in Stage 1.
In the Title field, paste the title (from Copy title).
In the Description field, paste the full description (from Copy desc) — do not lose the hashtag line at the bottom.
In the Tags field, paste the tags (from Copy tags).
Under Thumbnail, click Upload file and select the thumbnail you downloaded.
✓ DO
Upload the thumbnail file you downloaded from Nexus.
✕ DON’T
Use “Auto-generated” thumbnails. Ever.
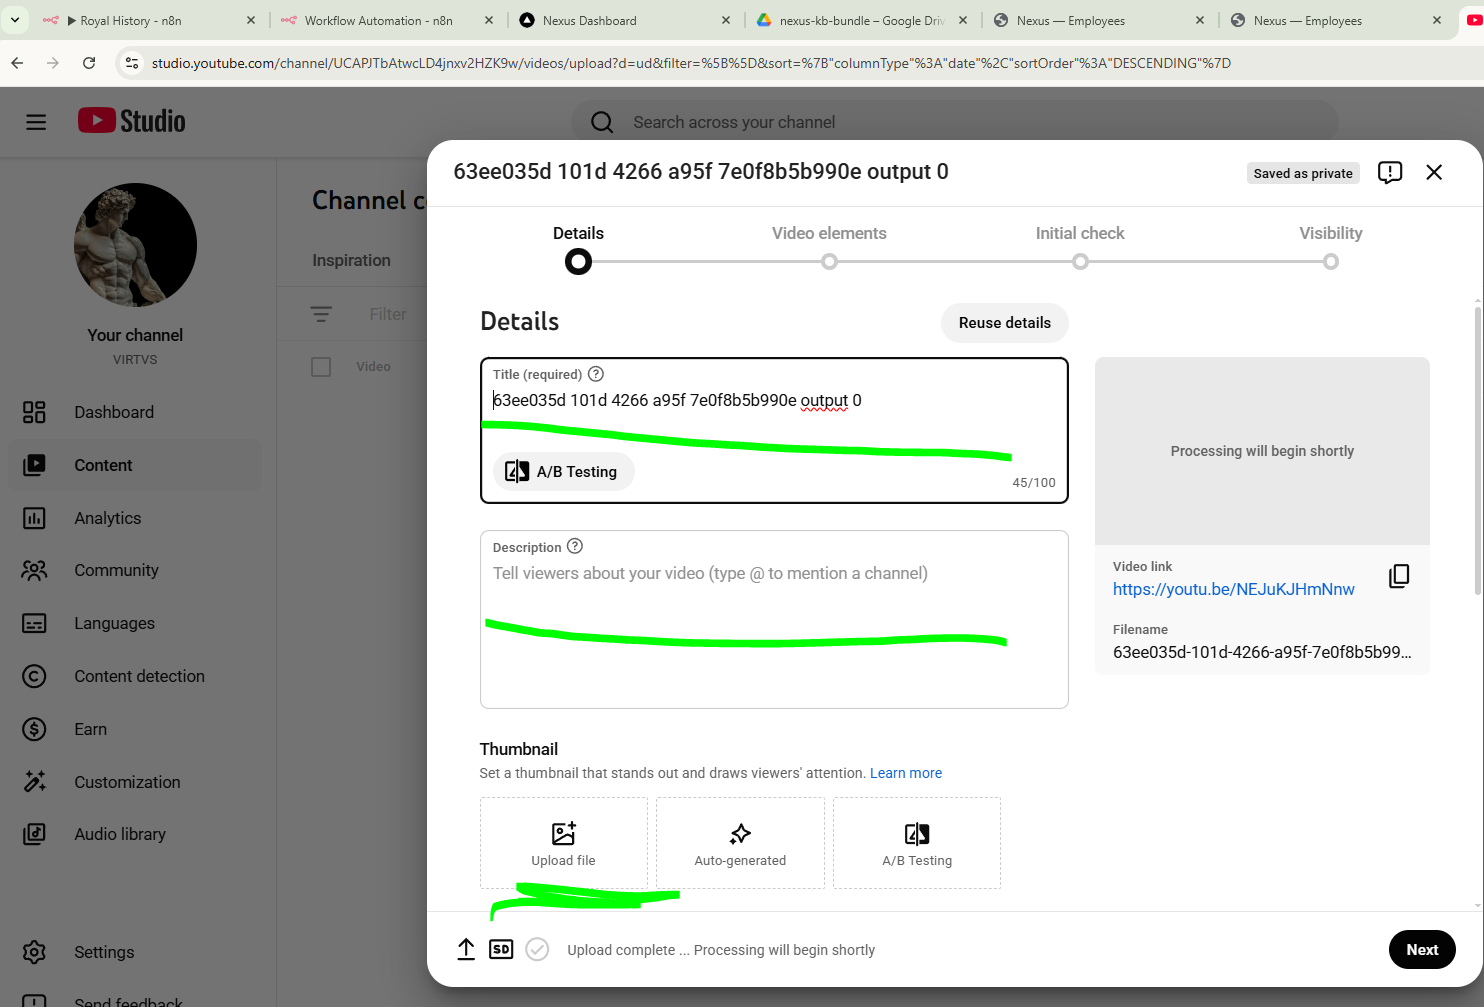
Title · Description · Thumbnail in YT Studio
Click through the remaining wizard steps (Video elements → Initial check → Visibility) and publish on the channel’s normal schedule.
STAGE 3
Mark as Uploaded in Nexus
Goal: Flip the row from ready to uploaded so the system knows it’s done and the cadence timer resets.
Go back to the Nexus row you just handled — same row, same five buttons you copied/downloaded from.
Click the green ✓ I uploaded it button on the right.
The row flips to uploaded, the channel’s UPLOADED counter ticks up by one, and the cadence clock on the Channels view resets.

Click “I uploaded it” ONLY after the video is live on YouTube
Legend
1The green button. One click. Confirms in a small dialog, then flips the row to uploaded. There’s an “Undo” in case you misclicked.
BONUS
The Walking Pool
Goal: Know what the Walking tab is and when to use it. Skip this section if you’re not assigned to walking work.
The Walking tab is a shared pool of vlog clips that any VA can pick up — not tied to a specific channel.
Each row has just two buttons: Download and Uploaded. No copy buttons because walking clips don’t have pre-written descriptions — you write your own context when posting.
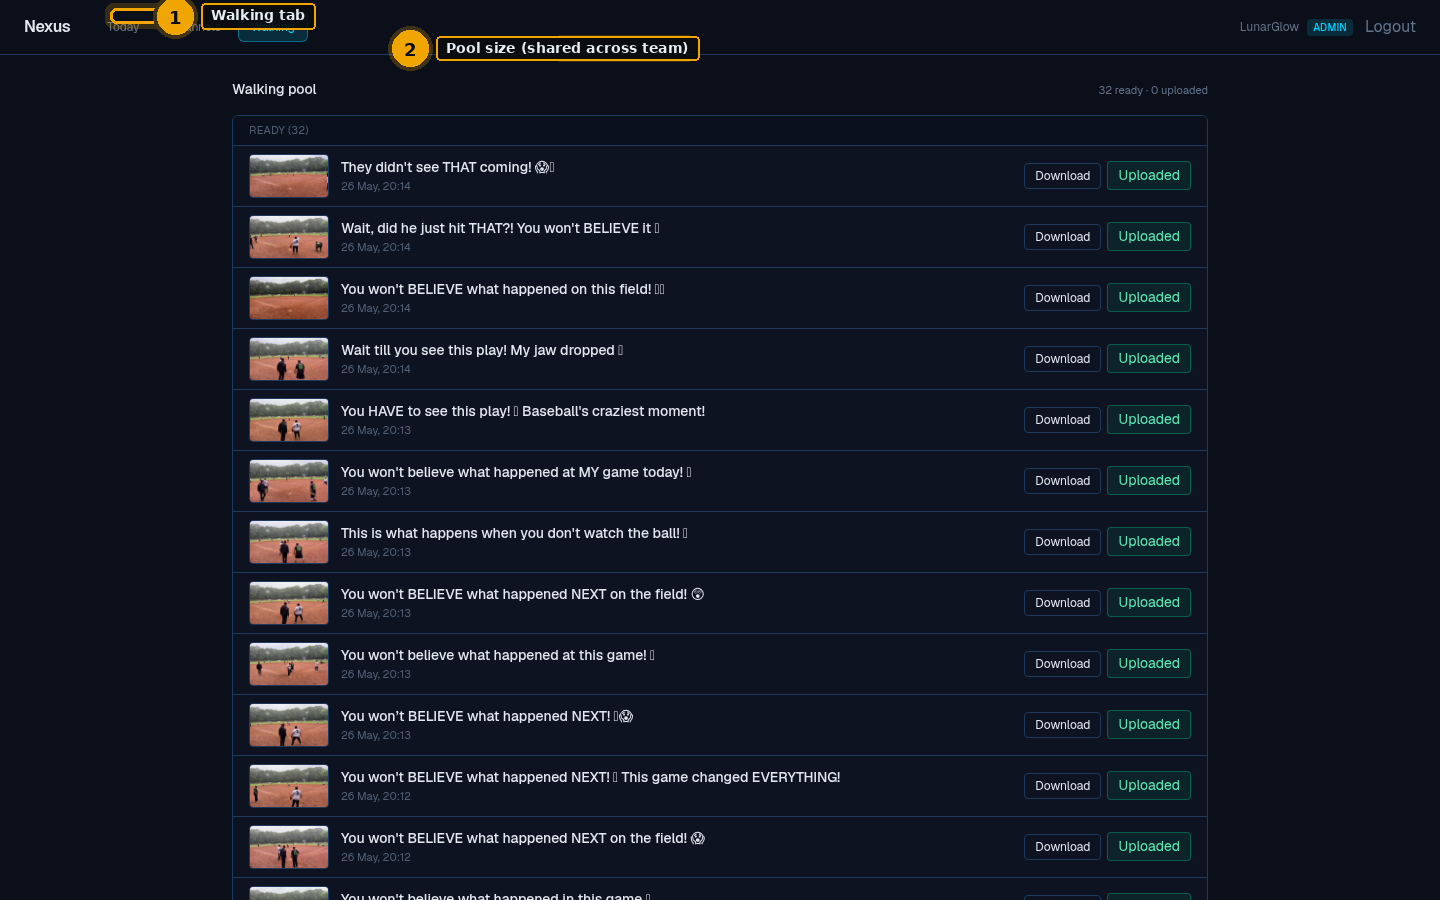
Walking pool — shared across the team
Legend
1Walking tab in the top nav.
2Pool size. How many clips are ready vs. already uploaded across the whole team.